Per a realitzar un streaming amb una webcam utilitzant Python i un servidor local accessible en la xarxa local, necessitaràs les següents llibreries: OpenCV i Flask. A continuació, et mostraré un exemple senzill de com podríes implementar-ho.
Primer, assegura’t de tenir instal·lades les llibreries requerides. Pots instal·lar-les utilitzant pip:
pip install opencv-python flask
Un cop tinguis les llibreries, pots utilitzar el següent codi com a punt de partida per crear el teu servidor local de streaming amb Python:
import cv2
from flask import Flask, render_template, Response

app = Flask(__name__)

def capture_frames():
    camera = cv2.VideoCapture(0)
    while True:
        success, frame = camera.read()
        if not success:
            break
        # Conversió de la imatge a color a escala de grisos
        gray_frame = cv2.cvtColor(frame, cv2.COLOR_BGR2GRAY)
        # Mostrar la imatge original a color
        ret, color_jpeg = cv2.imencode('.jpg', frame)
        # Mostrar la imatge en escala de grisos
        ret, gray_jpeg = cv2.imencode('.jpg', gray_frame)
        yield (b'--frame\r\n'
               b'Content-Type: image/jpeg\r\n\r\n' + color_jpeg.tobytes() + b'\r\n\r\n'
               b'--frame\r\n'
               b'Content-Type: image/jpeg\r\n\r\n' + gray_jpeg.tobytes() + b'\r\n\r\n')

@app.route('/')
def index():
    return render_template('index.html')

@app.route('/video')
def video_feed():
    return Response(capture_frames(),
                    mimetype='multipart/x-mixed-replace; boundary=frame')

if __name__ == '__main__':
    app.run(host='0.0.0.0', port=5000)
Assegura’t de tenir un fitxer HTML anomenat «index.html» a la mateixa carpeta que conté el teu codi Python. Aquest fitxer HTML és el que s’utilitzarà per mostrar el streaming de vídeo a través del navegador. A continuació tens un exemple senzill d’un fitxer «index.html»:
<!DOCTYPE html>
<html>
<head>
    <title>Streaming de webcam</title>
</head>
<body>
    <h1>Streaming de webcam</h1>
    <img src="{{ url_for('video_feed') }}" width="640" height="480">
</body>
</html>
Després d’executar el teu script Python, pots accedir al teu servidor local utilitzant l’adreça IP del teu ordinador i el port 5000. Per exemple, si estàs executant el servidor al teu ordinador local, pots provar d’accedir a «http://localhost:5000/» o «http://:5000/» des d’un navegador a la mateixa xarxa local.
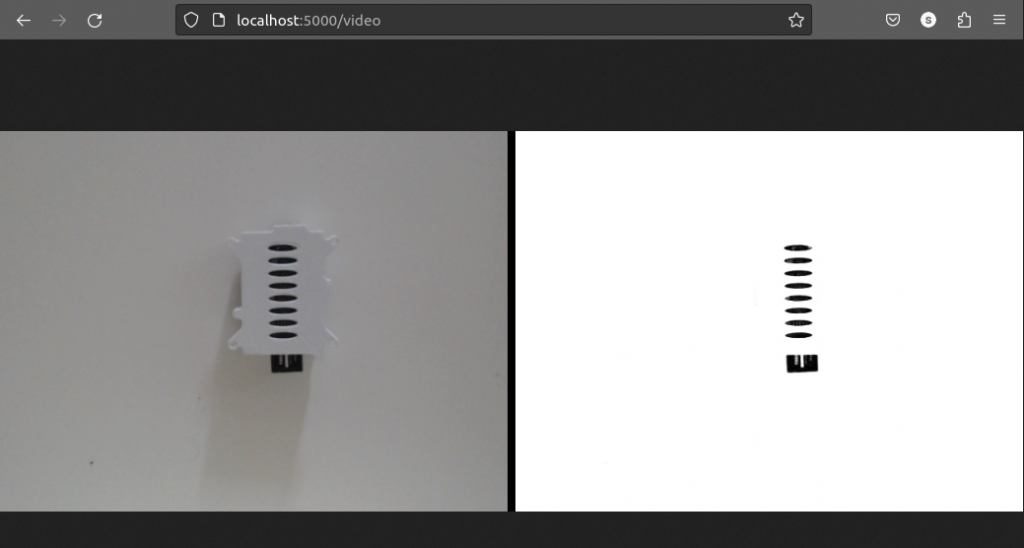
Amb aquesta implementació, veuràs el streaming en directe de la teva webcam amb dues imatges: una en color i l’altra en escala de grisos.
Exemple:
from flask import Flask, Response
import cv2
import numpy as np

app = Flask(__name__)

# Crea un objeto para capturar video de la webcam

def generate_frames():
    cap = cv2.VideoCapture(0)

    # define the alpha and beta
    alpha = 3 # Contrast control ( 0 to 127)
    beta = -50 # Brightness control( 0-100)

    if not cap.isOpened():
        print("Cannot open camera")
        exit()
    while True:
       # Lee un fotograma del video
       ret, frame = cap.read()

       # Convierte el fotograma a blanco y negro
       gray_frame = cv2.cvtColor(frame, cv2.COLOR_BGR2GRAY)
       adjusted = cv2.convertScaleAbs(gray_frame , alpha=alpha, beta=beta)
       # Añade una barra vertical para separar las imágenes
       separator = np.zeros((frame.shape[0], 10, 3), dtype=np.uint8)

       # Concatena las imágenes en una sola COLOR_BGR2Luv
       #combined_frame = np.hstack((frame, separator, cv2.cvtColor(gray_frame, cv2.COLOR_GRAY2BGR)))
       combined_frame = np.hstack((frame, separator, cv2.cvtColor(adjusted, cv2.COLOR_GRAY2BGR)))

       # Convierte el fotograma combinado a formato de imagen JPEG
       ret_combined, buffer_combined = cv2.imencode('.jpg', combined_frame)

       # Convierte el buffer a una secuencia de bytes
       frame_bytes_combined = buffer_combined.tobytes()

       # Genera la imagen combinada como respuesta HTTP
       yield (b'--frame\r\n'
              b'Content-Type: image/jpeg\r\n\r\n' + frame_bytes_combined + b'\r\n')

@app.route('/')
def index():
    return "Servidor de streaming local"

@app.route('/video')
def video_feed():
    return Response(generate_frames(),
                    mimetype='multipart/x-mixed-replace; boundary=frame')

if __name__ == '__main__':
    #app.run(host='0.0.0.0', port=5000, debug=True)
    app.run(port=5000, debug=True)